
The control starts up in Incremental jog mode. In order to jog the axes in continuous movement, you need to press the INCR/CONT key to switch from incremental to continuous jog mode.
The Machine Home position is fully X- (carriage to left), Y+ (tables to front), Z+ (head up) and U+ (maximum head spacing).
|
The control starts up in Incremental jog mode. In order to jog the axes in continuous movement, you need to press the INCR/CONT key to switch from incremental to continuous jog mode. |
Use the LEFT TABLE and RIGHT TABLE keys on the pendant to select which work table should run as the Y axis when a CNC part program runs.
If a table has been selected, but not yet engaged as Y, the LED in the button will flash. Once a selected table has been engaged, the LED in the button will remain on steadily.
To select both tables (for simultaneous, synchronized motion) press the LEFT TABLE and RIGHT TABLE keys simultaneously.
CNC part programs can use the following M functions to manage table selection:
| M80 | Engage the selected table(s) | M84 | Disengage both tables |
Generally, every program should begin with a call to M80, before any Y axis movement. M80 will move both tables to the front (home) if needed, then slave the selected table(s) to the Y master servo (see below).
It is generally not necessary to program M84. This code is provided for testing and maintenance.
The Shoda is a twin-table router. The programmable Y axis can be the left table; the right table; or both tables at once.
The Centroid CNC control manages this by having three servo drives and motors dedicated to table movement.
The control's internal Y axis is a small motor located in the back of the drive cabinet. This motor does not move anything, but serves as a master reference for Y positions.
The control labels the left-table servo motor 'V'. This is axis #4 in the control's internal tables. The control labels the right-table servo motor 'W'. This is axis #5 in the control's internal tables.
At any given time, either V, W, or both are slaved to the master Y servo.
Axis slaving/pairing is ultimately controlled by Machine Parameter 64 in the Centroid Machine Parameters table. The M80 code engages selected tables by setting appropriate values in Parameter 64.
You can start and stop the Quincy vacuum pump using the VAC PUMP A key on the main pendant.
Use the foot valves to apply and release vacuum on the left and right tables, as needed.
The control will check for adequate vacuum on the active table any time a program cycle is running and one or more spindles is running. If sufficient vacuum is not detected, the control will cancel the job and display an error message.
You can "dry run" part programs by turning on Dry Run Mode with the Aux1 key. Aux1 is the blank blue key in the top row, next to the U axis jog keys.
With Dry Run Mode on, the job will run normally, except that the air slides will not activate. This should keep all tools well clear of the table and any sheet of material that may be in place.
The spindles will still start and stop, and the Z axis will still move.
The control will not require vacuum on the active work table(s) when running in Dry Run Mode.
Press the Aux1 key again to cancel Dry Run Mode and allow jobs to run normally.
You can send all of the machine axes back to their home positions by executing a G28 code using the MDI prompt.
In a CNC program, spindles are selected with the M3 and M17 codes.
| T__ M3 S__ | Select the specified spindle, start all selected spindles and lower their slides | T__ M17 | Select the specified spindle | M18 | Deselect all spindles and slides |
To select and start one spindle, simply specify its T code on the same line with an M3 spindle-start command. For example:
T1 M3 S18000will select spindle #1, start it running, and lower its slide.
To select and start multiple spindles, specify the T codes for the additional spindles with the M17 code, on lines preceding the M3. For example:
T11 M17
T13 M3 S18000
will select spindles 11 and 13, start them both, and lower both slides.
When the spindles are stopped with an M5 code, all will be automatically deselected.
In manual operation, you can select and deselect spindles by pressing the numbered keys on the jog pendant. A flashing LED indicates that a spindle has been selected. A steady LED indicates that the spindle has been selected and is running.
Select one or more spindles; choose Manual Spindle Mode; and press the green Spindle Start key in the upper left section of the jog pendant. All selected spindles will start, and their slides will move down.
You can also lower and raise the slides for selected spindles, without starting the motors, using the SLIDE DOWN key on the jog pendant.
Select the desired spindle and press SLIDE DOWN to lower the slide. Press the SLIDE DOWN key again to raise the slide back up.
The Auxiliary keys on the jog panel have the following functions:
| Dry Run Mode On/Off |  |
Jog U Minus (Left) |  |
Jog U Plus (Right) | |
 |
Select Spindle #1 |  |
Select Spindle #2 |  |
Select Spindle #3 |
 |
Select Spindle #11 |  |
Select Spindle #4 |  |
Select Spindle #13 |
 |
Move Slides for Selected Spindles Down/Up |
 |
Start/Stop Vacuum Pump A |  |
Start/Stop Vacuum Pump B (optional expansion) |
| Engage Selected Table(s) |  |
Select Left Table |  |
Select Right Table |
In addition to the jog pendant, the Shoda is equipped with a Centroid CWP-4 wireless MPG handwheel pendant. The handwheel pendant can be used for axis jogging and for cycle start, feed hold, and cycle cancel control.
To use the MPG pendant, first press its silver power button. The display on the pendant should show the first four lines of the DRO axis position display.
To move an axis using the handwheel:
In addition to the MPG handwheel, the CWP-4 pendant has Cycle Cancel, Feed Hold, and Cycle Start keys. These keys function the same as the equivalent keys on the main jog pendant.
There are two axis jog keys: "JOG +" and "JOG -". These keys will jog whichever axis is selected with the axis-select switch, in the jog mode (INCR/CONT, FAST/SLOW) that is selected on the main jog pendant.
There are four customizable Macro keys. As of November 13, 2018, these keys have the following functions:
| Macro 1 |
Selected Slides Down/Up (same as SLIDE DOWN key on main pendant) | Macro 2 |
no function | Macro 3 |
Select Left Table (same as LEFT TABLE key on main pendant) | Macro 4 |
Select Right Table (same as RIGHT TABLE key on main pendant) |
The CWP-4 pendant relies on a USB-connected wireless transceiver. This transceiver should be located next to the monitor base, and should be plugged into one of the control computer's USB ports.
The CWP-4 pendant requires two AA batteries. The battery compartment is on the back, underneath the protective rubber cover.
| M3 | Start selected spindles (including for any tool specified on the line with M3) |
| M5 | Stop and deselect spindles |
| M11 | Rotate drill bank #2 to 0° (align with bridge) |
| M12 | Rotate drill bank #2 to 90° (align with tables) |
| M13 | Rotate drill bank #4 to 0° (align with bridge) |
| M14 | Rotate drill bank #4 to 90° (align with tables) |
| M17 | Select the spindle for the specified T code (necessary when selecting multiple spindles prior to M3) |
| M18 | Deselect all spindles (used when operating slides without M3/M5) |
| M27 | Lower slides for selected spindles (not necessary when starting spindles with M3) |
| M28 | Raise slides (not necessary when stopping spindles with M5) |
| M33 | Clamp U axis |
| M34 | Unclamp U axis |
| M80 | Engage Y axis servo pairing for the selected work table(s) |
| M84 | Cancel Y axis servo pairing for both work table |
M functions M91 and above are used internally in custom macro programs, but are generally not used directly in user machining programs.
See Chapter 13 of the Centroid M-Series Operator's Manual for descriptions of the higher-numbered M functions.
The following parameters on the Centroid Machine Parameters table are used for features specific to this machine.
| Parameter | Meaning | Value | |
|---|---|---|---|
| P980 | Spindle number to activate (used internally by M3 and M17 macros) | 1-4, 11, 13 |
For all other Machine Parameter functions, see Chapter 14 of the Centroid M-Series Operator's Manual.
Any time the control cannot complete its tasks normally, it will display a message in the scrolling message box, in the upper right corner of the screen, explaining what went wrong. You can use the mouse to scroll up (back) in the message box to view the most recent 10 or so messages.
You can view older messages in the error message log, accessible from the F7/Utility menu:
Most common messages are described in Chapter 15 of the Centroid M-Series Operator's Manual.
The machine-specific PLC program can generate several of its own fault, error and warning messages, in addition to those listed in the Centroid operator's manual.
You can use the PLC Diagnostic display on the console to view some of the Centroid PLC input and memory locations mentioned with these fault and error conditions. At the control's main screen, press Alt-I to activate the PLC Diagnostic display. Press Alt-I again to dismiss it.
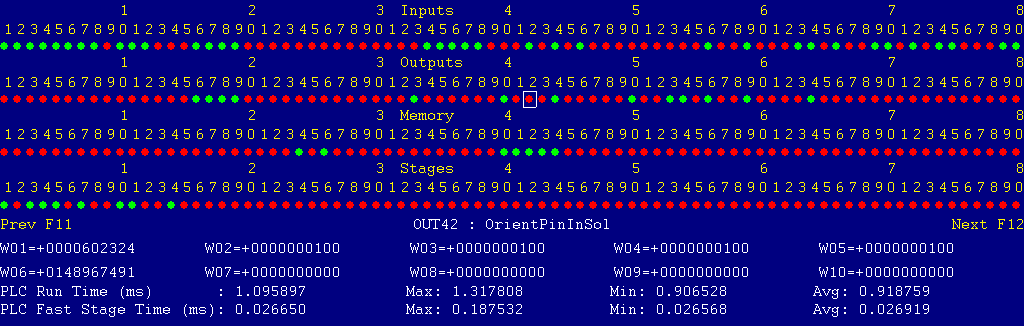
Each page of the Diagnostic display shows four rows of red and green dots: the first row shows PLC inputs 1 through 80; the second row PLC outputs 1 through 80; the third row PLC memory bits 1 through 80; and the fourth row PLC program stages 1 through 80.
You can use the arrow keys to move a highlight box over any of these locations. The name of the highlighted location will be displayed in the center of the screen below the red and green dots.
For example, in the illustration above the highlight box is on Output #42: The dot below the 2, to the right of the superscript 4, on the second line.
Below the four rows of bit status information are ten numeric ("word") variable values, labeled W1 through W10. Some of these variables also hold useful status information, described with the error and fault conditions to follow.
There are multiple pages of Diagnostic data. With the Alt-I diagnostic display showing, you can use the F12 and F11 keys to scroll right and left. For example, pressing F12 once will shift to the page showing inputs and outputs 81 through 160, and word variables W11 through W20.
Messages with 9000-series message numbers are Faults. After resolving the problem, you must press and release the Emergency Stop button to clear a Fault.
Messages with 8000-series message numbers are Errors. Errors will cancel the program cycle and stop the spindle and coolant, but they do not then need to be explicitly reset.
Messages with 5000-series and 2000-series message numbers are Warnings and Informational Messages. They do not cancel the cycle or require any action to reset.
The control detected an internal error in processing the PLC logic program.
Report this error to your dealer, along with the values from W14 and W15. Also report what function the machine was performing when the fault occurred.
You must shut down and cycle the power to clear this fault.
References:
PLC W14: Copy of internal SV_PLC_FAULT_STATUS, indicating the type of problem
PLC W15: Copy of internal SV_PLC_FAULT_ADDRESS, indicating the location of the problem
One of the servo amplifiers is reporting a fault condition.
If possible, check the LED display on the amplifier itself, in the left end cabinet, to see the specific fault code.
See the Yaskawa Sigma series user manuals for detailed fault information.
Press and release Emergency Stop to clear the fault.
References:
PLC MEM16: Axis #1 drive status.  Green = okay, Red = fault
PLC MEM17: Axis #2 drive status.  Green = okay, Red = fault
PLC MEM18: Axis #3 drive status.  Green = okay, Red = fault
PLC MEM19: Axis #4 drive status.  Green = okay, Red = fault
PLC MEM20: Axis #5 drive status.  Green = okay, Red = fault
PLC MEM21: Axis #6 drive status.  Green = okay, Red = fault
Schematic: Lines 33, 39, 50, 55, 60, 65
The control unit detected loss of communication from the operator panel in the pendant.
Check for damage or disturbance to the cables between the pendant and the Oak control unit in the control cabinet.
Press and release Emergency Stop to clear the fault.
References:
Schematic: Lines 116, 124
The operator panel reported back to the control unit a loss of communication from the control unit. This indicates the return signal from the pendant is functioning normally, but the outgoing signal may have problems.
Check for damage or disturbance to the cables between the pendant and the Oak control unit in the control cabinet.
Press and release Emergency Stop to clear the fault.
References:
Schematic: Lines 116, 124
You exited the CNCM control software without first pressing Emergency Stop.
Always press Emergency Stop prior to exiting the control software.
Press and release Emergency Stop to clear the fault.
One of the variable-frequency spindle drives powering the router spindles is reporting a fault condition.
Check the LED display on the associated Hitachi VFD, on the back of the machine bridge. Typical VFD faults are overload, overvoltage, overcurrent, or overheat.
Press the red STOP/RESET button on the affected spindle drive to reset it, then press and release the CNC control's Emergency Stop button to clear the fault condition.
References:
PLC INP17: Alarm signal from VFD #1.  Green = 1 = Okay, Red = 0 = Fault
PLC INP18: Alarm signal from VFD #3.  Green = 1 = Okay, Red = 0 = Fault
PLC INP19: Alarm signal from VFD #11.  Green = 1 = Okay, Red = 0 = Fault
PLC INP20: Alarm signal from VFD #13.  Green = 1 = Okay, Red = 0 = Fault
Schematic: Lines 4, 9, 15, 21, 155-156
One of the router spindle motors tripped the overload relay on the output side of its VFD.
Check the overload relays OL1, OL3, OL11 and OL13, in the lower left part of the I/O cabinet on the back of the bridge, for trip indications.
Press the white RESET button on the tripped overload. You may have to wait several minutes for the overload to cool before it can be reset.
Press and release the CNC control's Emergency Stop button to clear the fault condition.
References:
PLC INP25: Trip indication from all four overloads.  Green = 1 = Tripped, Red = 0 = Okay
Schematic: Lines 2, 7, 13, 19, 159
The drill motor for spindle #2 (left side drill bank) tripped its overload relay.
Check the overload relay OL2, below starter MC2 in the lower left part of the I/O cabinet on the back of the bridge, for a trip indication.
Press the white RESET button on the tripped overload. You may have to wait several minutes for the overload to cool before it can be reset.
Press and release the CNC control's Emergency Stop button to clear the fault condition.
References:
PLC INP26: Trip indication from OL2.  Green = 1 = Tripped, Red = 0 = Okay
Schematic: Lines 24, 160
The drill motor for spindle #4 (right side drill bank) tripped its overload relay.
Check the overload relay OL4, below starter MC4 in the lower left part of the I/O cabinet on the back of the bridge, for a trip indication.
Press the white RESET button on the tripped overload. You may have to wait several minutes for the overload to cool before it can be reset.
Press and release the CNC control's Emergency Stop button to clear the fault condition.
References:
PLC INP27: Trip indication from OL4.  Green = 1 = Tripped, Red = 0 = Okay
Schematic: Lines 26, 160
The control tried to enable and run the Z axis servo, but one of its interlocks prevents it from running. Either pressure switch PSITZ indicates there is not adequate air pressure for the counterbalance, or switch LDITZ on the clamp cylinder is not showing that the clamp piston has been retracted.
Check the incoming air supply.
If you have to troubleshoot the circuit, be aware that the fault condition will have powered off the Z servo, which in turn will have reapplied the Z clamp. You will only see a closed circuit across LDITZ when the clamp is released: generally when the Z servo is enabled.
Once the problem has been resolved, press and release the CNC control's Emergency Stop button to clear the fault condition.
References:
PLC INP38: Combined Z Interlock.  Green = 1 = Ready to run, Red = 0 = Not ready
Schematic: Lines 172, 212, 234
The control lost communication with one or more of the PLC I/O expansion boards.
Power down, open the control cabinets, and check the connections at both ends of the gray cables which connects H8 & H9 on the Oak unit to H3 on the two PLCADD1616 boards.
Power up and check for green "PLC OK" LED indications on each of the expansion boards.
References:
PLC W36: bitmap of detected PLC expansion boards.  3 = two boards detected
Machine Parameter 900: bitmap of expected PLC expansion boards.  3 = two boards expected
Schematic: Lines 118, 154, 169
The CNC program attempted to rotate drill bank #2 from the 90° position back to the 0° position with an M11 code, but the U axis (head spacing control) is too far to the left. Swinging the drill bank would cause it to collide with the right-hand head.
References:
PLC INP39: U axis interference switch LS3F.  Green = 1 = Right head is clear, Red = 0 = Right head in interference zone
Schematic: Line 173
You attempted to start a main router spindle (#1, #3 or both), but one of the spindle lockpins is pressed in.
Verify that both lockpins are released, then restart the program cycle.
References:
PLC INP45: Spindle lockpin switches.  Green = 1 = Spindle locked, Red = 0 = Both spindles free
Schematic: Line 176
A CNC program cycle is running and the spindle has been started, but vacuum is not applied to the active work table.
Verify that the vacuum pump is running; check the foot valve to turn on vacuum to the active table; then restart the program cycle.
If needed, check the display on the QPSL-AN-42 vacuum switches, mounted on the manifold behind each table. The QPSL-AN-42 display should be green, and should show at least 4PSI vacuum.
References:
PLC INP31: Vacuum sensor for left table.  Green = 1 = Vacuum applied, Red = 0 = Low or no vacuum
PLC INP32: Vacuum sensor for right table.  Green = 1 = Vacuum applied, Red = 0 = Low or no vacuum
Schematic: Lines 162, 163
You gave the control an automatic or manual Spindle Start command, but no spindle was selected.
If this warning appears in an automatic program cycle, check that you have a valid T code with the M3 command.
If this warning appears in manual operation, be sure to select a spindle using the white jog pendant keys before pressing Spindle Start.
The U axis (head spacing control) servo was clamped with M33, but then tried to move anyway. In this case the control automatically releases the clamp to prevent damage.
Be sure to program M34 to release the clamp before moving the U axis to a new position.
The PLC program requested display of a message on the screen, but the provided message code was not valid.
This indicates an error in the PLC program. Report the message to your dealer, along with the value in PLC variable W16.
References:
PLC W16: stores the invalid message code
The PLC hardware detected the presence of an I/O expansion board, but the setting of Machine Parameter 900 did not tell it to expect that board in the system.
On this machine, there should be two I/O expansion boards installed, and Machine Parameter 900 should be set to 3.0.
References:
PLC W36: bitmap of detected PLC expansion boards.  3 = two boards detected
Machine Parameter 900: bitmap of expected PLC expansion boards.  3 = two boards expected
A previous servo drive fault condition has been resolved, and cleared with Emergency Stop.
A previous PLC fault condition has been resolved, and cleared with Emergency Stop.
You inadvertently pressed a keyboard combination that is used for keyboard jogging controls, but keyboard jogging features have been disabled on this machine.
A previous fault condition has been cleared with Emergency Stop.
The order of the axis drives; order of the axis definitions in the control configuration menus; and order of the axis jogging controls can vary. Definitions are as follows:
| Axis | Axis # | Drive # | Drive-Okay Bit | Jog Keys | MPG Position |
|---|---|---|---|---|---|
| X | 1 | 1 | MEM16 | X | 1 (X) |
| Y | 2 | 2 | MEM17 | (none) | (none) |
| Z | 3 | 3 | MEM18 | Z | 3 (Z) |
| V | 4 | 4 | MEM19 | V | 4 |
| W | 5 | 5 | MEM20 | Y | 2 |
| U | 6 | 6 | MEM21 | U (Aux2/Aux3) | none |
The two vacuum switches, PSLSU on INP31 and PSRSU on INP32, are ProSense model QPSL-AN-42 sensors from Automation Direct (www.automationdirect.com).
Setup is as follows:
| Out1 mode | "EASy" | |
| NO/NC setting | "1C2o" | Out1 closed below setpoint, open above setpoint |
| Response time | 30ms | |
| Display color | "G-on" | Green if output 1 is on (pressure below setpoint) |
| Units | PSI | |
| Setpoint | -4.0 PSI |
Note that the pressure measurement and setpoint are signed values. Vacuum is a negative pressure value. Therefore the measured pressure goes below the (negative) setpoint when adequate vacuum has been applied. Measured pressure is above the setpoint when vacuum is not applied.
The inline plug connecting the vacuum switches to the control cable is a 4-position Molex Mini-Fit Jr. plug. The male plug is installed on the vacuum switch.
The connector pinout is as follows:
| Pin | Color | Label | Meaning |
|---|---|---|---|
| 1 | BRN → RED | P1 | +24VDC |
| 2 | BLK → WHT | PSxSU | Output 1 to PLC input |
| 3 | BLU → BLK | N1 | 0VDC |
| 4 | n/c |
13-Jun-2025
http://www.cncsnw.com/K103349/K103349Inst.htm
![]()